You know that feeling when you snap a photo after an amazing workout, only to find it doesn’t capture the definition and strength you see in the mirror? It’s frustrating.
That’s where otot² (o²) photos come in. This style of photography is designed to showcase muscularity and physical form with real artistic impact.
In this guide, I’ll walk you through a clear, step-by-step process for anyone—from fitness enthusiasts to aspiring photographers—to create these powerful images.
We’ll cover essential lighting, posing, and camera techniques. These are the keys to translating all that hard work in the gym into stunning photographs.
Mastering these photos isn’t just about looking good; it’s about celebrating dedication and capturing the peak aesthetic of the human body, both in motion and at rest.
What Exactly Are ‘Otot² Photos’?
Otot translates to muscle, and otot² photos are a specialized genre focusing on highlighting muscle definition, separation, and vascularity.
These aren’t your typical gym photos. The intent here is to create dramatic, high-impact visuals, much like professional fitness photography.
The o² in the name? It’s all about oxygen-fueled power and the explosive energy required for peak athletic performance.
Key characteristics of otot² photos include:
- High contrast
- Dramatic shadows
- Sharp focus on muscle texture
- Poses that maximize the appearance of size and definition
These photos are used for tracking fitness progress. They’re also great for building a personal brand on social media. Or, if you’re into it, just creating artistic portraits of your physique.
They help you see and show off the hard work you put into your body.
The Technical Guide: Lighting and Camera Settings for Maximum Definition
Lighting is everything. It can make or break your shot. Harsh, direct side-lighting is the secret to carving out muscle detail with shadows.
Imagine the light slicing across the body, creating deep, dramatic shadows that highlight every curve and contour.
Flat, front-facing light? It washes out definition, making everything look flat and uninteresting. Trust me, you don’t want that.
Here’s a simple lighting setup anyone can try. Use a single light source, like a window or a lamp, positioned to the side and slightly above the subject. This creates a natural, sculpted look.
Now, let’s talk camera settings. If you’re using a smartphone, switch to portrait mode. It blurs the background, putting all the focus on the subject.
Manually tap to focus on the primary muscle group. Slightly lower the exposure to deepen those shadows. It makes the muscles pop.
Camera angles matter too. Shoot from a slightly lower angle. This makes the subject appear more powerful and heroic.
Eye-level shots are neutral, while high angles can diminish presence. Think about it—how do you want your subject to be perceived? Zumoto
A clean, non-distracting background is key. A solid black, grey, or textured wall ensures the focus remains entirely on the subject’s physique. You don’t want anything in the background competing for attention.
o²
Remember, the goal is to create a vivid, immersive experience. The right lighting, camera settings, and angles will make your photos stand out.
Posing and Preparation: How to Flex for the Camera
Getting a ‘pump’ right before the shoot is key. It’s all about doing a few sets of high-repetition exercises to increase blood flow and make your muscles look fuller.
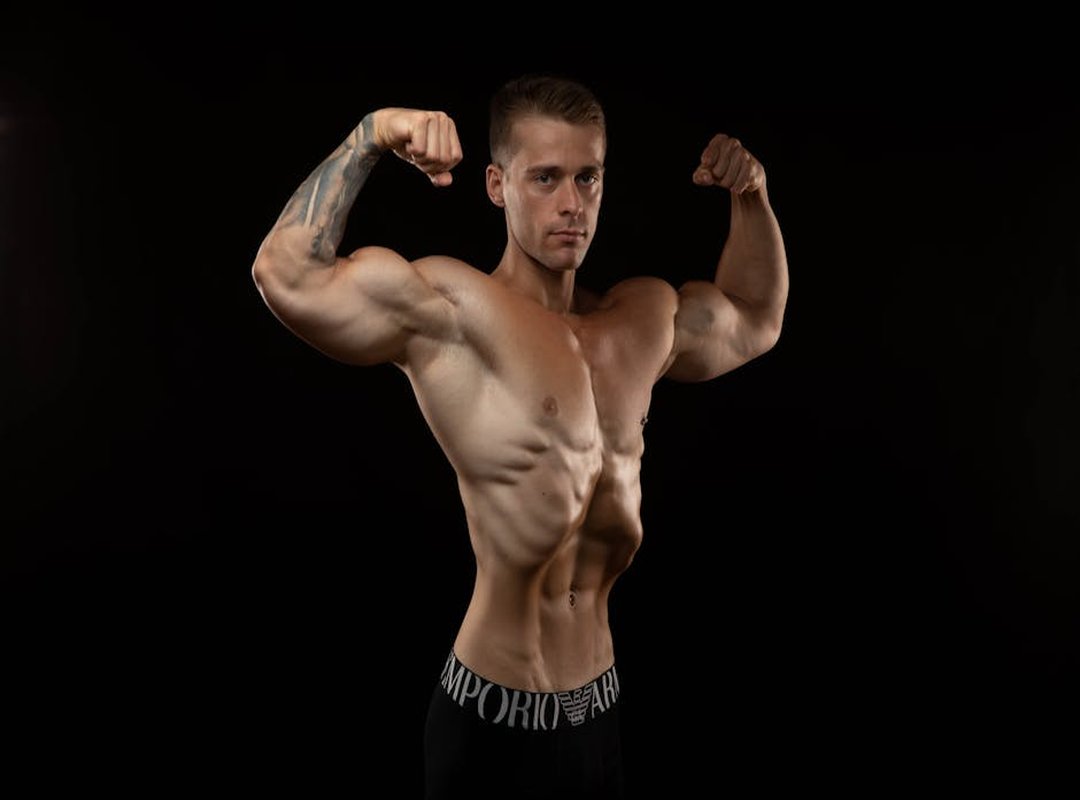
Let’s break down three fundamental poses. First, the side-chest pose. This one highlights the chest and shoulders.
Stand sideways, flex your biceps, and push your chest out. Simple, but effective.
Next, the back-double-biceps pose. This showcases your entire back. Turn your back to the camera, flex your lats, and squeeze your biceps.
It’s a classic for a reason.
Lastly, the quad stomp. This leg-focused pose is all about showing off those quads. Step forward, bend one knee, and flex your quads.
It’s a powerful look.
Flexing isn’t just about squeezing hard. It’s about controlling the contraction and exhaling fully to tighten your core and improve definition. Trust me, it makes a huge difference.
Dynamic shots can be more authentic and powerful than static ones. Think about capturing the peak of a pull-up or the bottom of a squat. These in-motion shots often look more natural and intense.
Pro tip: Use oil or a light sheen of water on your skin. It catches the light and accentuates your muscle contours. (o²)
Remember, it’s not just about looking good; it’s about feeling confident and strong. That confidence will shine through in your photos.
Putting It All Together for a Powerful Final Image
Strategic side-lighting, a powerful pose, and a clean background are the core components for a successful shoot. The goal is to create an image that tells a story of strength and discipline, elevating it beyond a simple snapshot to something more artistic.
This week, pick one pose from this guide and experiment with moving a single lamp around you to see how the shadows change your definition.
Post-processing can further enhance your image. Simple edits like increasing contrast, sharpening details, and converting to black and white can add drama and focus.
otot² (o²) photos are a rewarding way to document and celebrate the results of consistent effort and hard work.